Ticket Merge/Link
This feature introduces 2 new capabilities in the system: merging and linking Tickets.
The Ticket Merge feature allows you to combine two or more Tickets so that their threads will all be in one Ticket. We will call this the Parent Ticket.
Linking allows you to group tickets together without actually manipulating any Tickets. It just gives you a quick way to access Tickets
that may be related in some way.
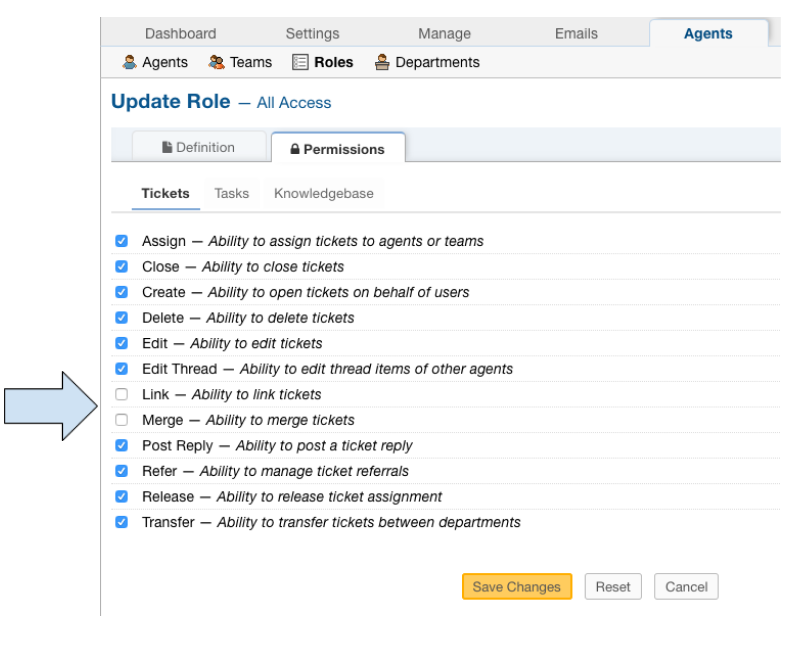
Merge and Link Role
In order for an Agent to be able to merge or link Tickets, they must be assigned a Role that has permission to do so. In my examples, only the ‘All Access’ Role
has permission to merge or link Tickets. This can be configured by doing the following:
Go to:
Admin Panel | Agents Tab | Roles | Choose a Role | Click the Merge/Link checkbox
Merging Tickets
When Tickets are merged, all Ticket threads reside on one Parent Ticket. Any responses sent to a Child Ticket will automatically be routed to the Parent Ticket.
If Child Tickets remain in the system, they will simply be there as a historical record of any fields that were populated on the Child Tickets.
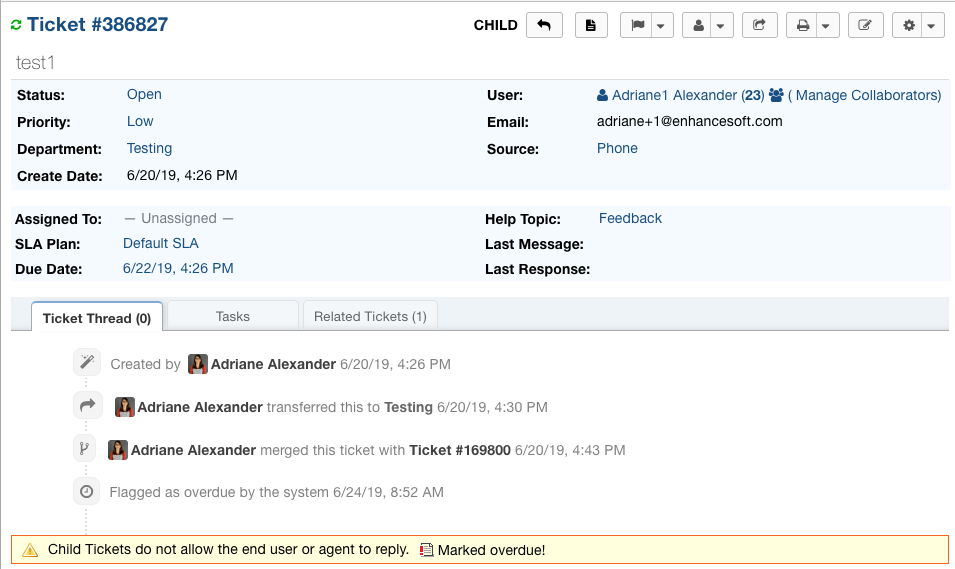
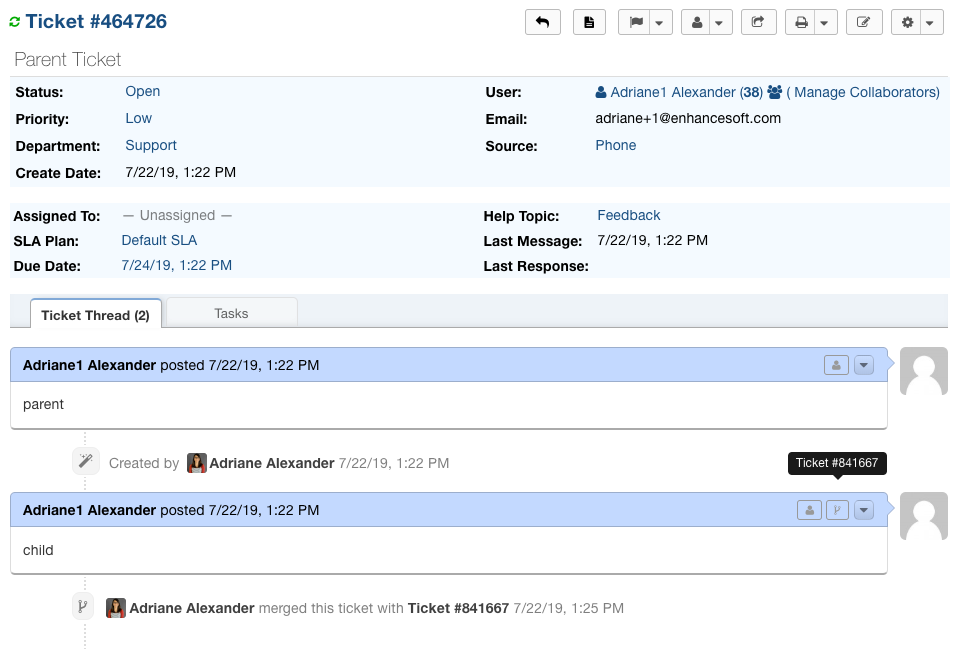
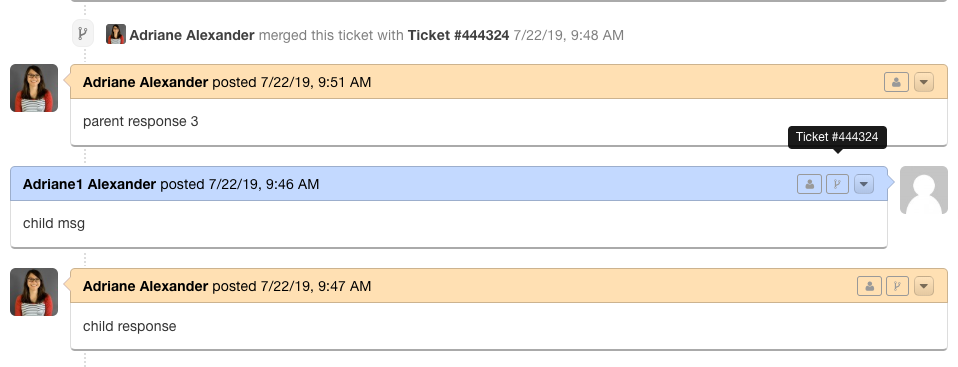
On the Parent Ticket, merged Thread Entries have the merge icon on them, and hovering over the icon will show the Ticket Number of the Child Ticket.
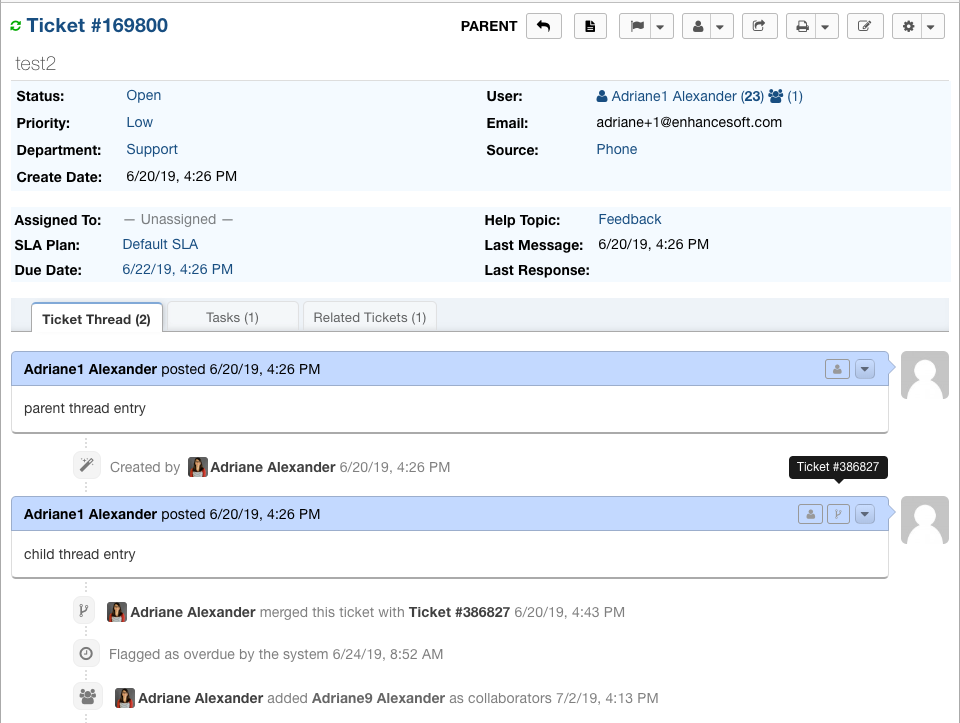
Both Tickets have a thread event indicating that the Tickets were merged.
There are 2 ways to merge Tickets:
1. From within a Ticket
2. From the Tickets queue
Merging from within a Ticket
The ‘Merge Tickets’ option can be found by going to the More dropdown.

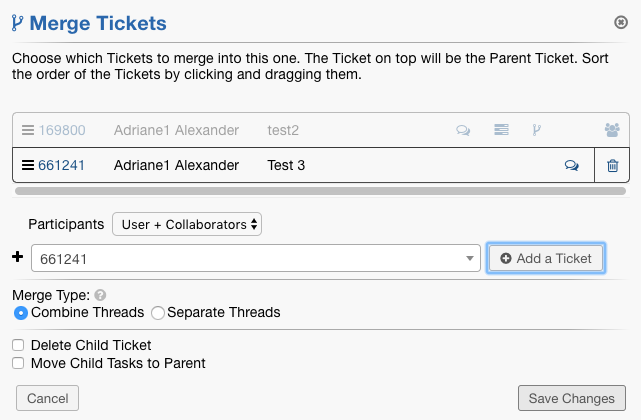
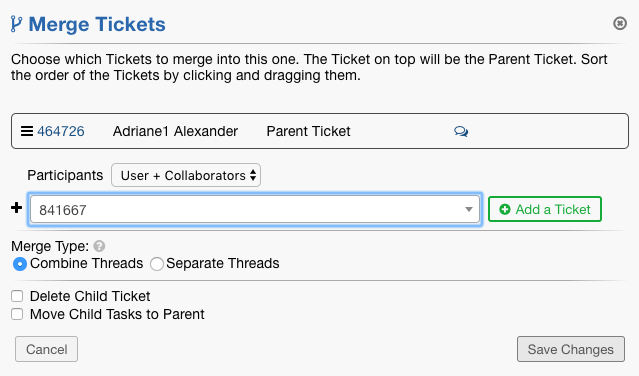
Once clicked, the Agent will see the Parent Ticket, which is the Ticket they are currently in, as well as the options available when merging Tickets.
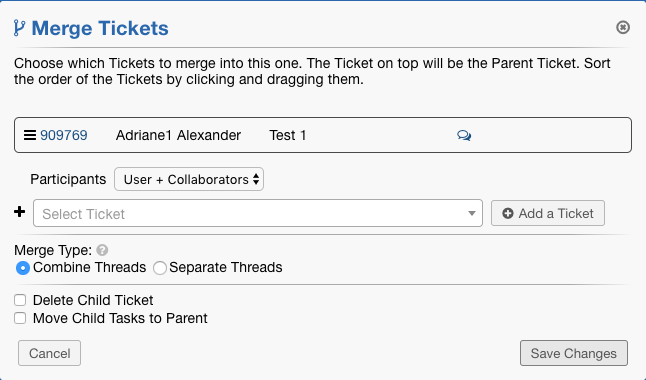
The first Ticket Number displayed in the list is the Parent Ticket. Moving a different Ticket to the top of the list will change the Parent to that Ticket.
Once a Ticket has been made a Parent, other Tickets can be merged to the Parent, however, the Parent Ticket can NOT be merged to any additional Tickets.
Merge Options
There are several different options that can be chosen when merging Tickets. We will outline the following below:
- Participants
- Merge Type
- Delete Child Ticket
- Move Child Tasks to Parent
Participants
The Participants dropdown allows you to choose how participants of child Tickets will carry over to the Parent Ticket. By default, this is set to ‘User + Collaborators’.
This means that participants of the child Ticket will be added as Collaborators to the Parent Ticket if they are not already participants of the Parent Ticket.
If the ‘User’ option is chosen, the User of Child Tickets will be added as Collaborators to the Parent Ticket if they are not already the User or a Collaborator on the Parent Ticket.
Merge Type
There are 2 types of Merges:
1. Combine Threads
2. Separate Threads
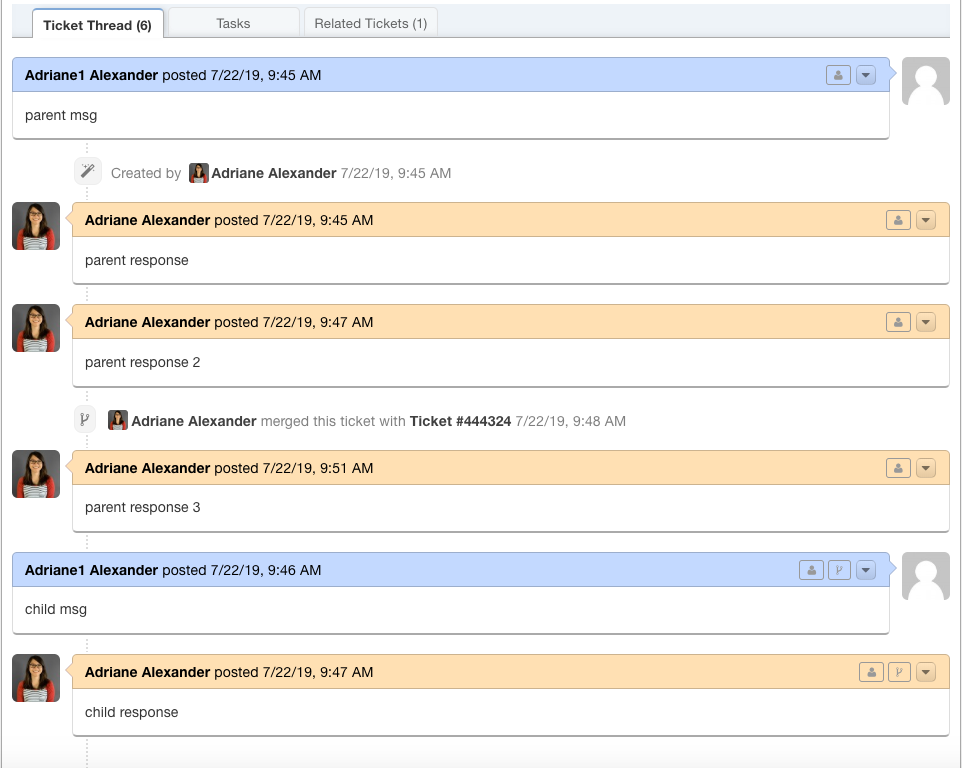
Combine Threads: Threads from all Tickets will be displayed chronologically.
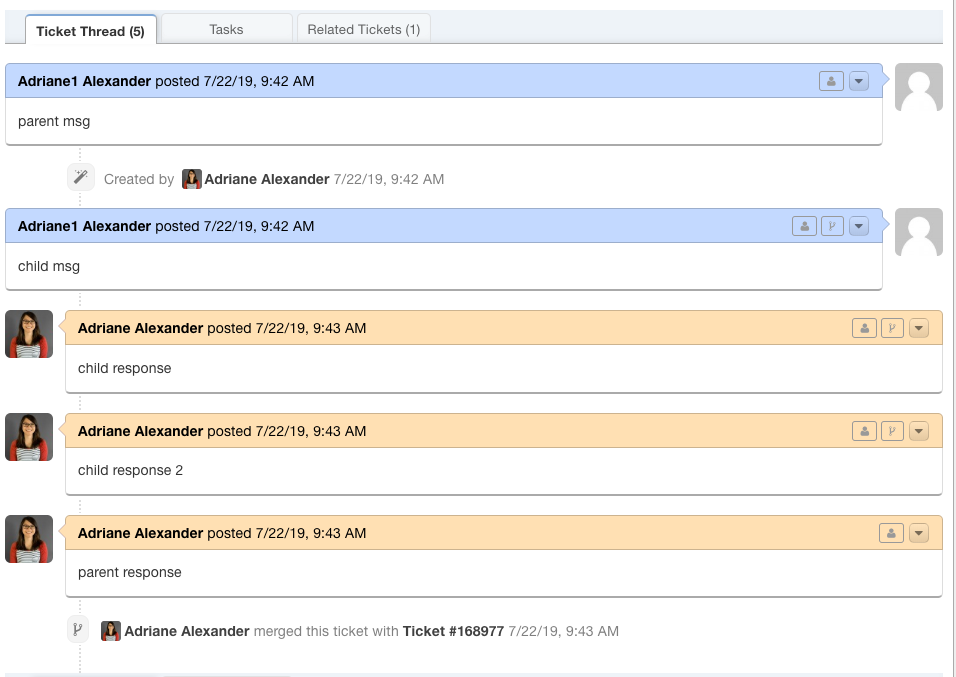
Separate Threads: Threads from Tickets will be displayed one Ticket at a time.
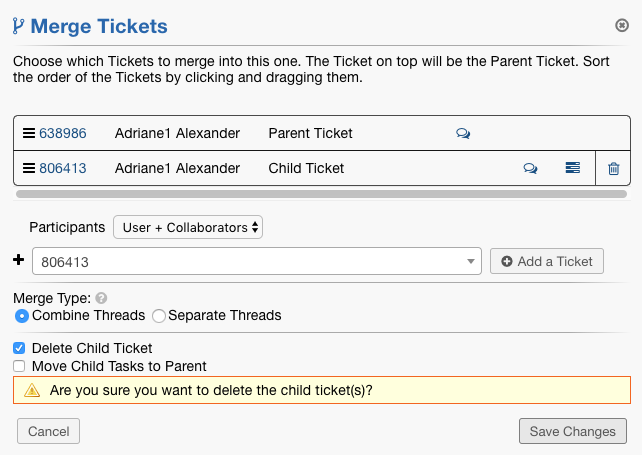
Delete Child Ticket
Checking this box will result in Child Tickets being deleted upon merging. Data from the Child Tickets is no longer in the system, so the Parent Ticket will not
be displayed as a merge, but rather a regular Ticket. It will still have a thread event stating that another Ticket was merged into it, and each child thread entry
will have the merge indicator icon beside it.
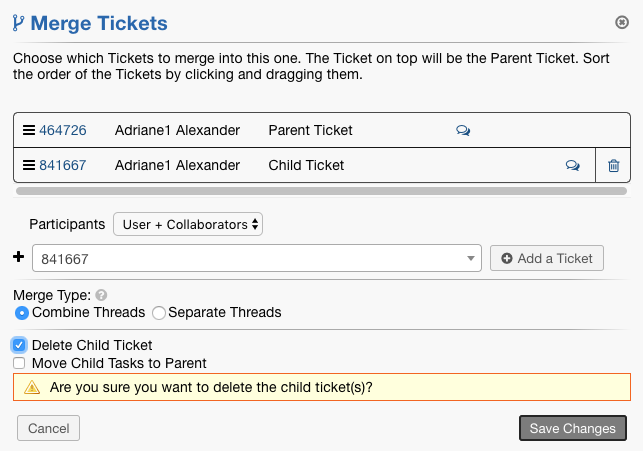
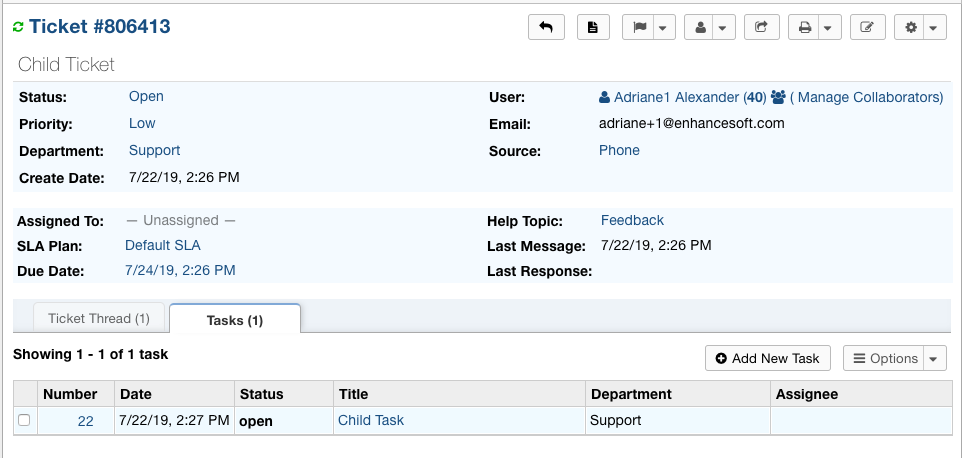
*Note: If there were any Tasks on a Child Ticket where the ‘Delete Child Ticket’ option was checked, those tasks would be moved to the Parent Ticket.
Ticket With Task Before Merging:
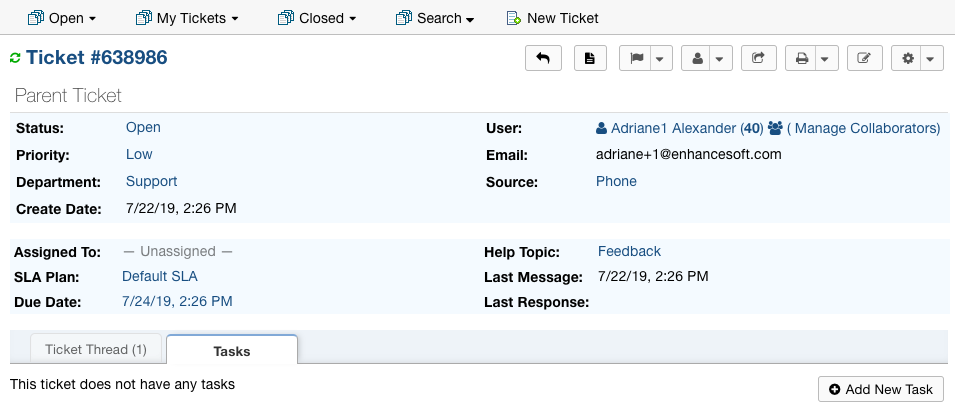
Ticket Without Task Before Merging:
Merge Tickets:
Move Child Tasks to Parent
If you are merging Tickets without deleting the child Tickets, there is also an option to manually move child Tasks to the parent Ticket.
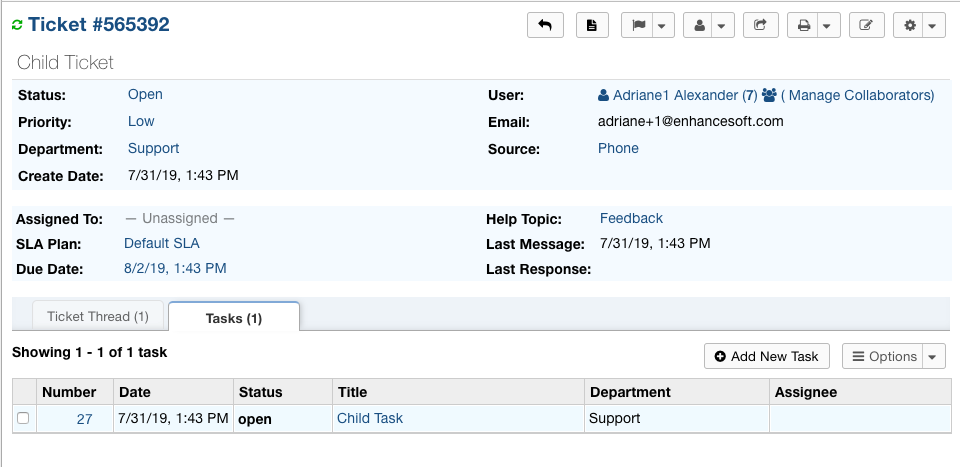
Ticket With Task Before Merging:
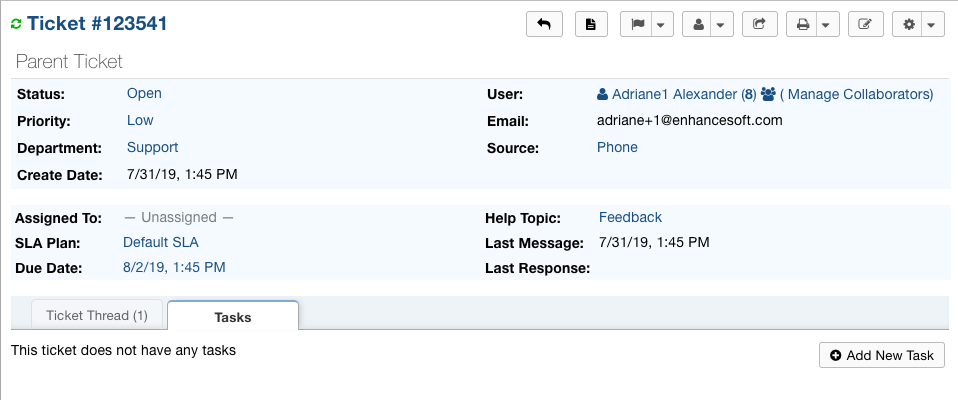
Ticket Without Task Before Merging:
Merge Tickets:
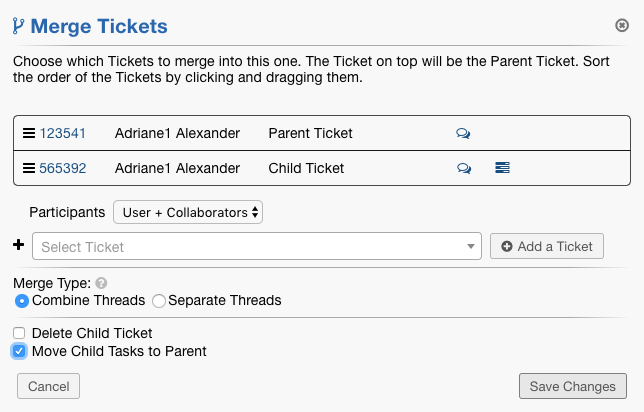
Parent Ticket After Merging:
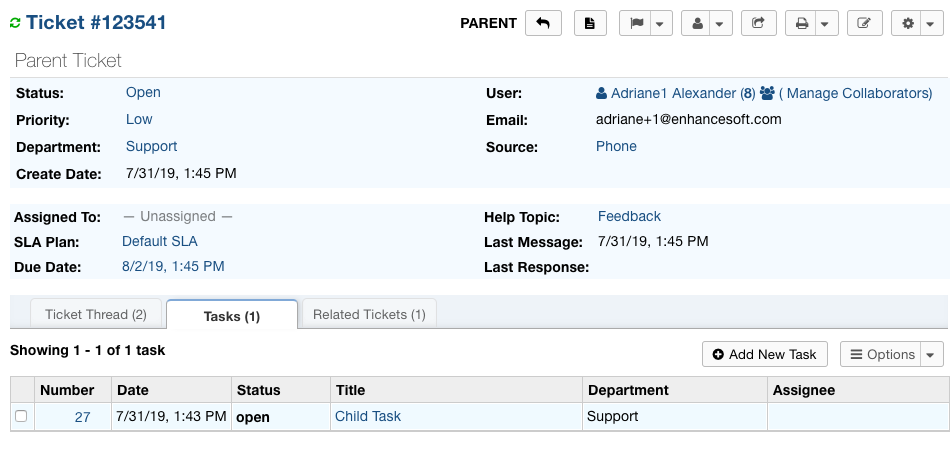
Child Ticket After Merging:
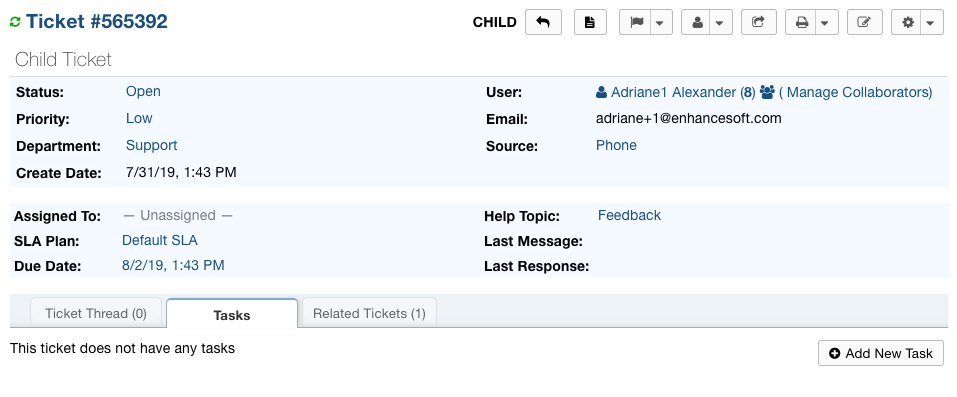
Parent Ticket After Merging:
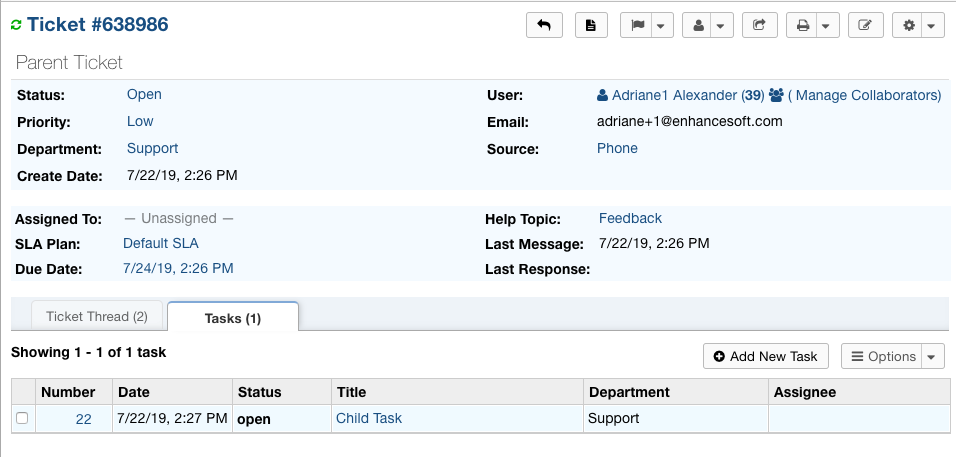
Adding Tickets to be Merged
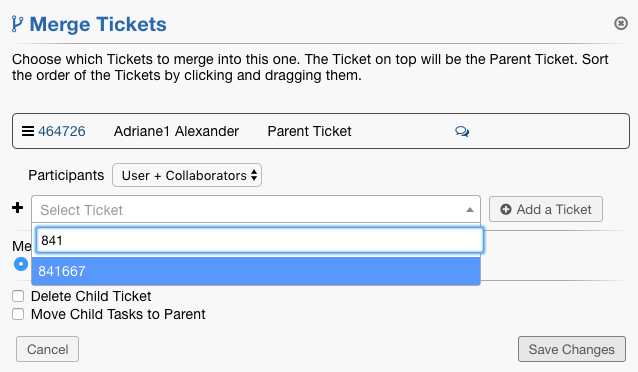
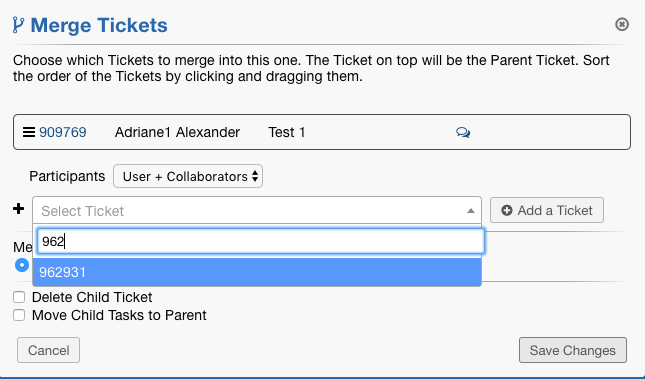
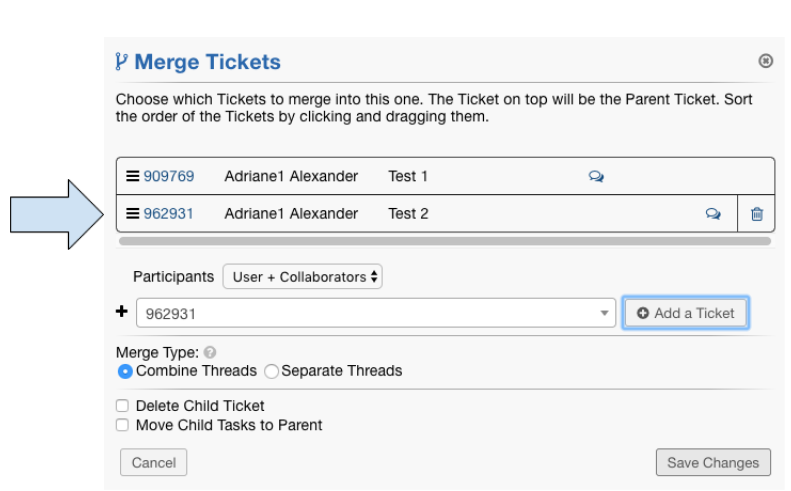
In order to merge in another Ticket, the Agent simply types the Ticket Number into the ‘Select Ticket’ box, select the desired Ticket, click Add a Ticket, and then Save Changes.
Merging from the Tickets Queue
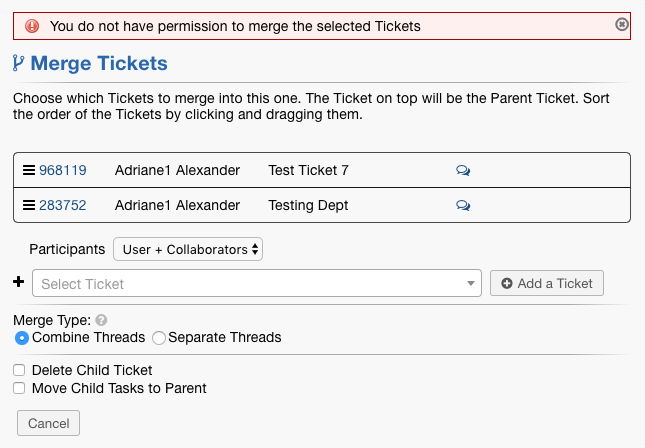
*Note: The Merge button will be displayed as long as the Agent has the Merge Role permission for at least one Department they have access to; they can only
merge tickets within the departments they have the Role permission to do so. If you do not have permission to merge Tickets from a Department, you will see the following error message.
If an Agent has a Role with permissions to merge Tickets, they can do so from the Tickets queue for Tickets of that Department. This can be done by using the check
boxes to select Tickets to merge and then clicking the ‘Merge’ button at the top right of the screen.
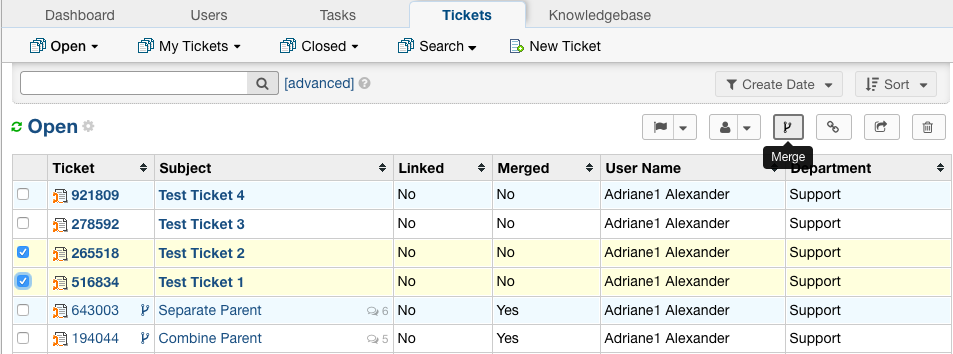
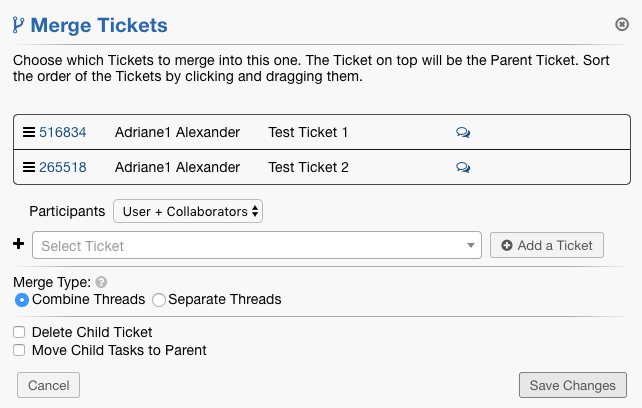
Once selected, the Agent can drag the Ticket they would like to be the Parent Ticket to the top of the list and then Save Changes to merge the Tickets.
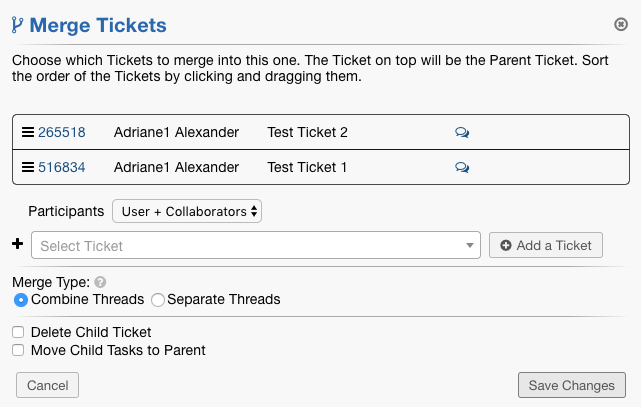

*Note: For merges, Children Tickets do not show up in the main Ticket queue, however, Agents can still search for them. In this example, Ticket #265518 is the
Parent Ticket and Ticket #516834 is the Child Ticket.
Hovering over the merge icon will allow Agents to see the type of merge that was done.
Ticket Permissions
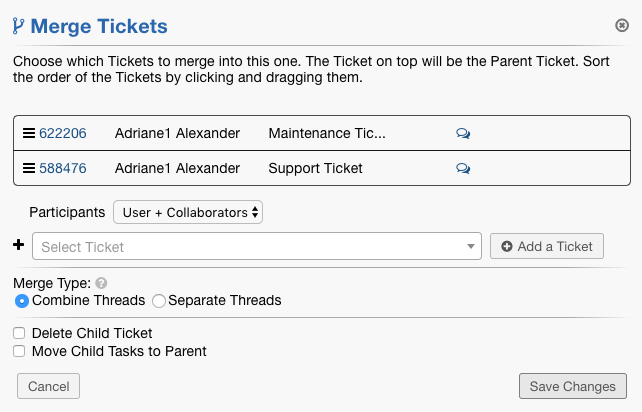
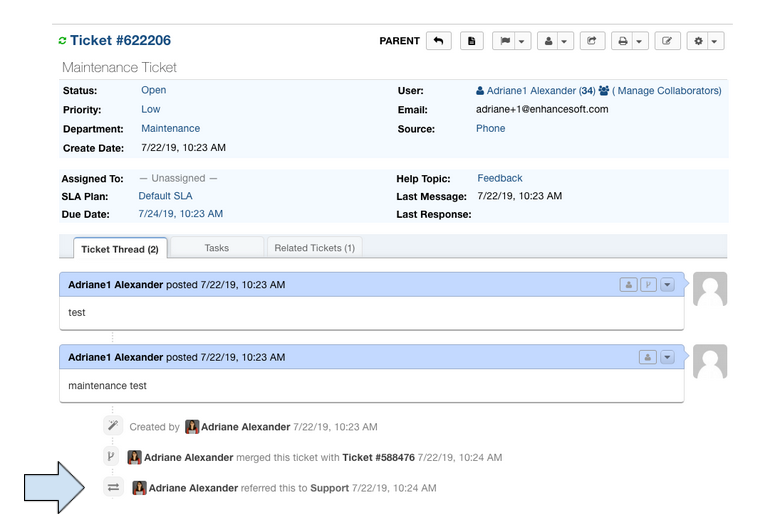
Ticket Permissions for merged Tickets are based upon an Agent’s access to the Parent Ticket’s Department. If Tickets with different Departments are being merged,
the Parent Ticket will automatically be referred to the Child Ticket’s Department so that the Agent will have access to both the Parent and Child Ticket. To read
more about Ticket Referrals, go here.
Tickets in different Departments:
Linking Tickets
Linking Tickets is similar to merging Tickets, however, linking Tickets does not actually combine thread entries. Linking Tickets simply adds a link to related
Tickets. The Tickets behave exactly as they did before with replies going to their respective Tickets. Linking can be done within a Ticket or from the Ticket queue.
Linking from within a Ticket
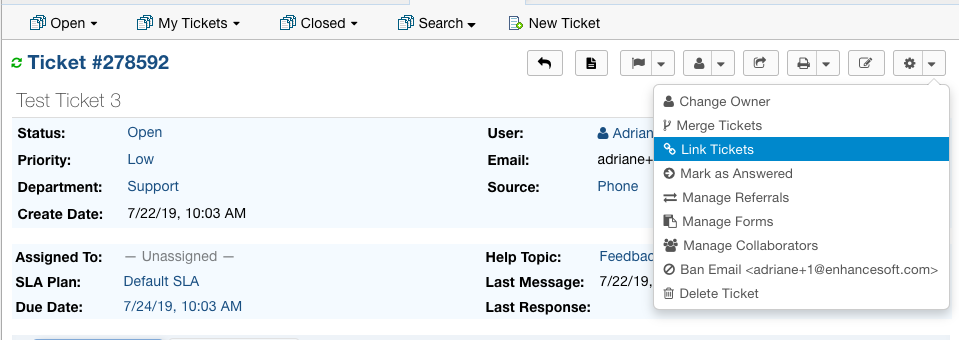
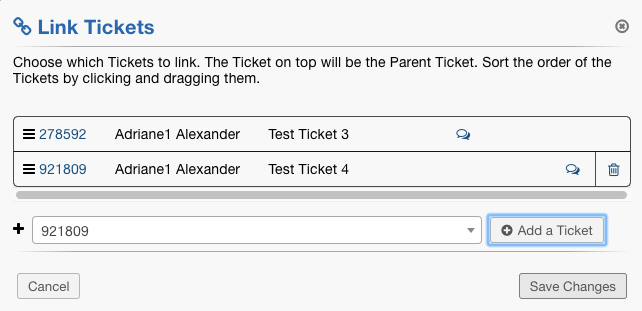
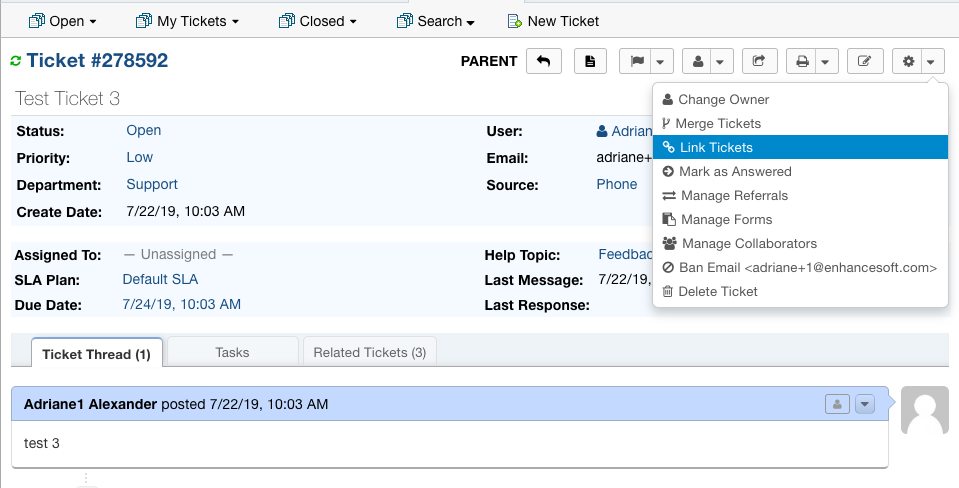
The ‘Link Tickets’ option can be found by going to the More dropdown.
Once clicked, the Agent will see the Parent Ticket, which is the Ticket they are currently in, as well as the options available when linking Tickets.
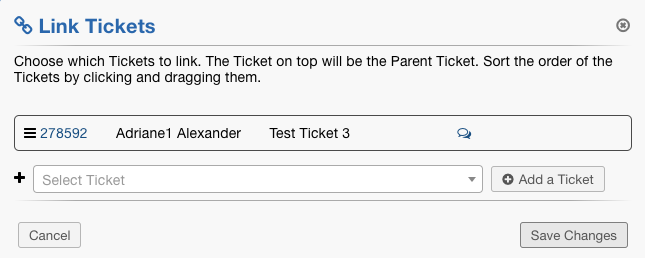
Notice that for linking Tickets, Agents only have the option to add Tickets since thread entries are not affected when linking Tickets. All Ticket data remains the same when linking.
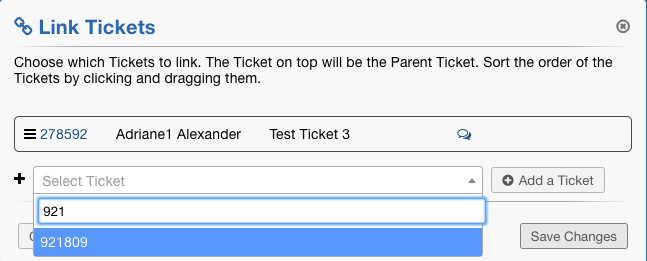
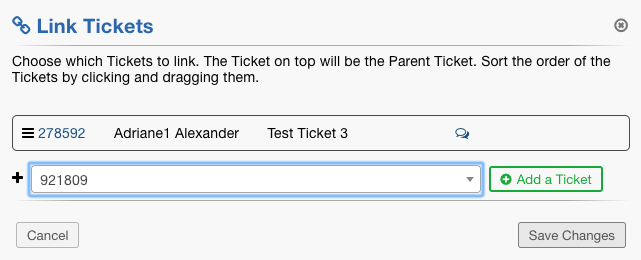
Linking from the Tickets Queue
Linking from the Tickets queue is done the same was as merging from the Tickets queue. Simply select the Tickets to link and then click the Link icon.
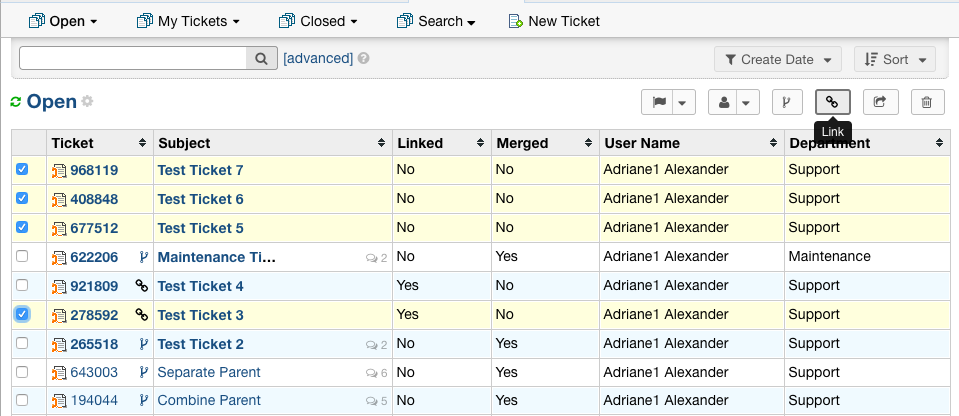
Remember, the Ticket on top will be the Parent Ticket. For this example, I want to use Test Ticket 3 as the Parent since it is already the Parent of Test Ticket 4.
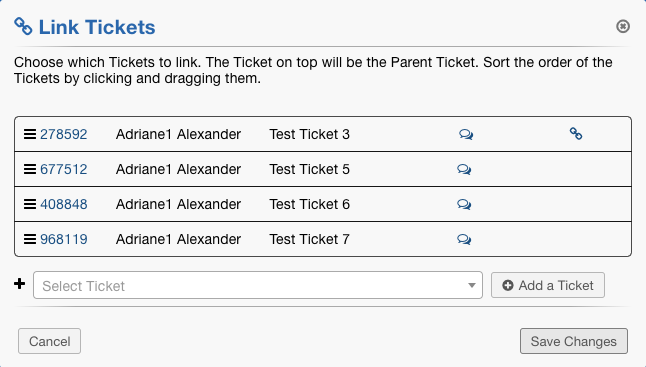
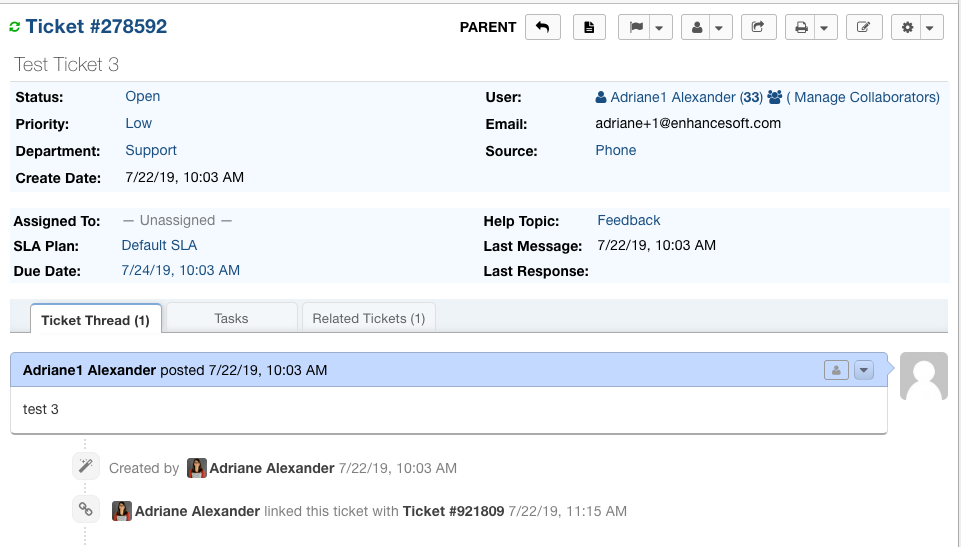
Now when I go back to the Parent Ticket, I can see all of its children listed in the Ticket.
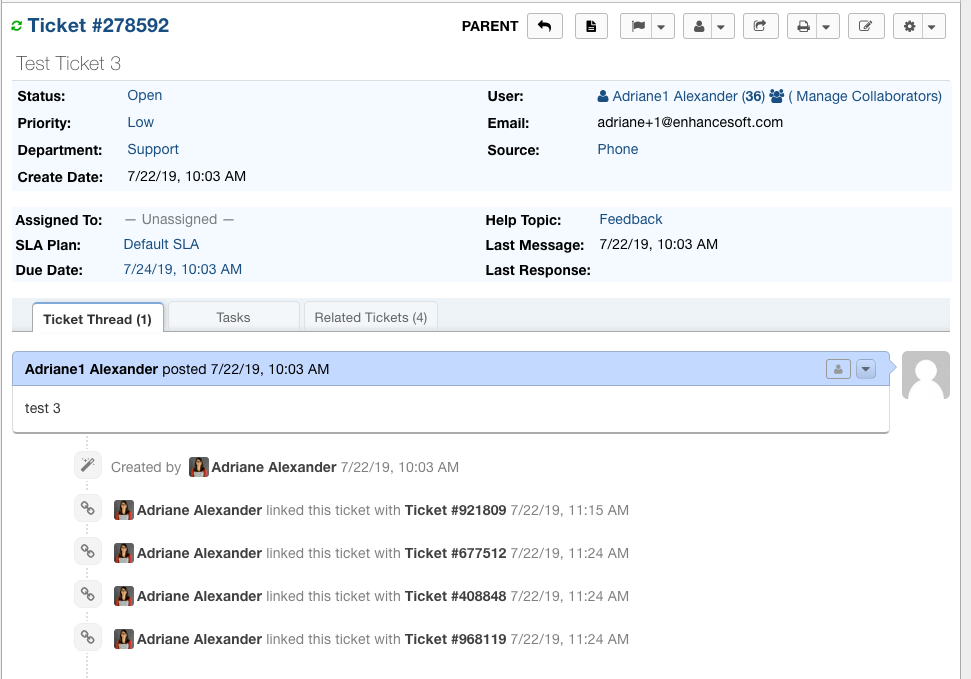
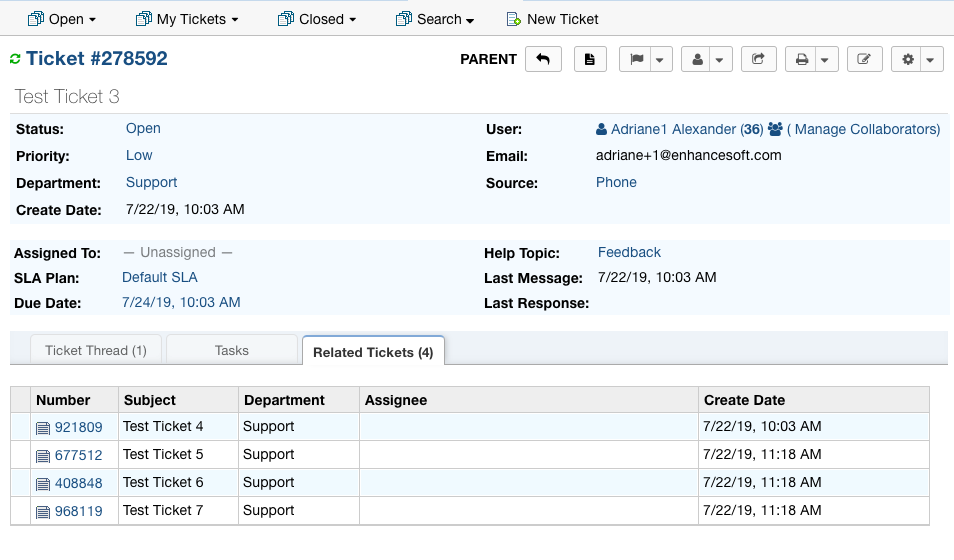
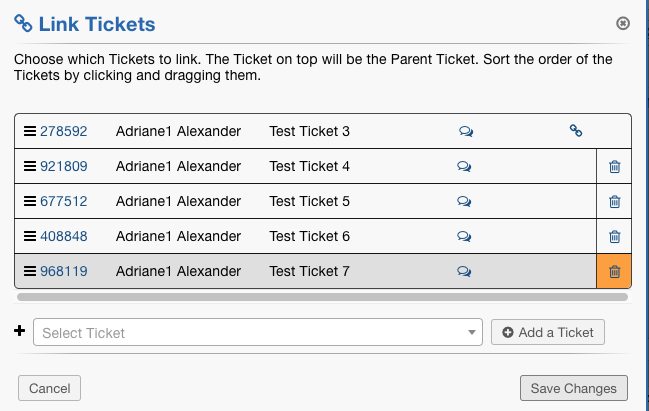
If I click the ‘Link Tickets’ option from this Parent Ticket, I am given the option to unlink Tickets as well as switch the Parent Ticket.

Unlink Tickets
To unlink a Ticket, simply click the garbage can icon beside the Tickets you want to unlink and save your changes.
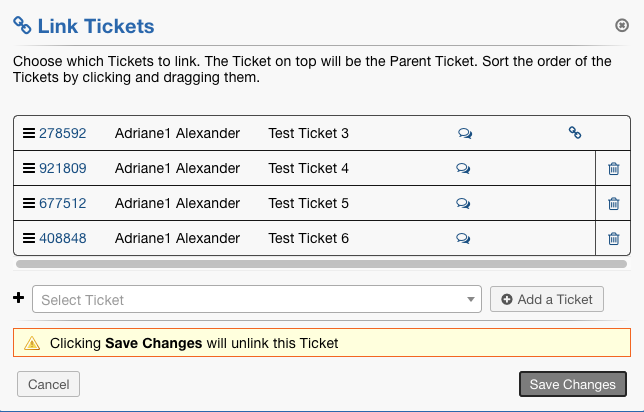
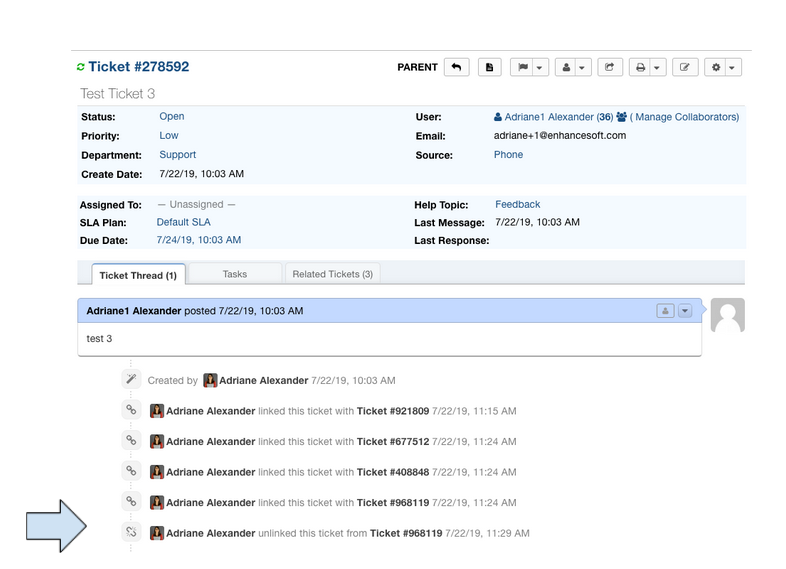
Switching Link Parents
Since linking Tickets does not change anything about any Ticket involved, you may change which Ticket is the Parent. Within the Ticket, go to the ‘Link Tickets’ option.
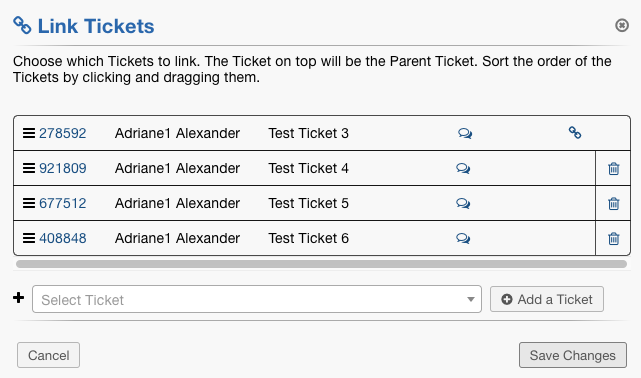
This shows you all of the linked Tickets. The Parent Ticket is on top of the list. To change the Parent, simply drag a different Ticket to the top of the list and Save Changes.
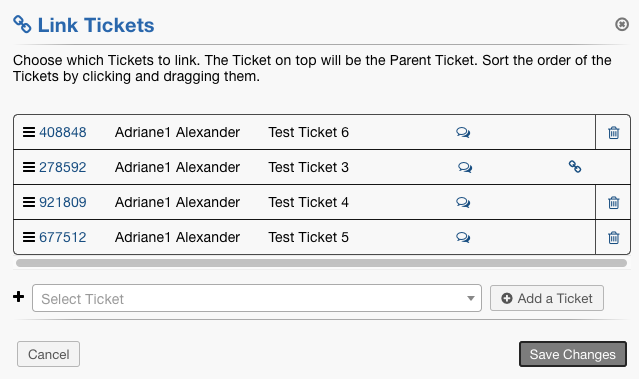
Now, Test Ticket 6 is the Parent Ticket.
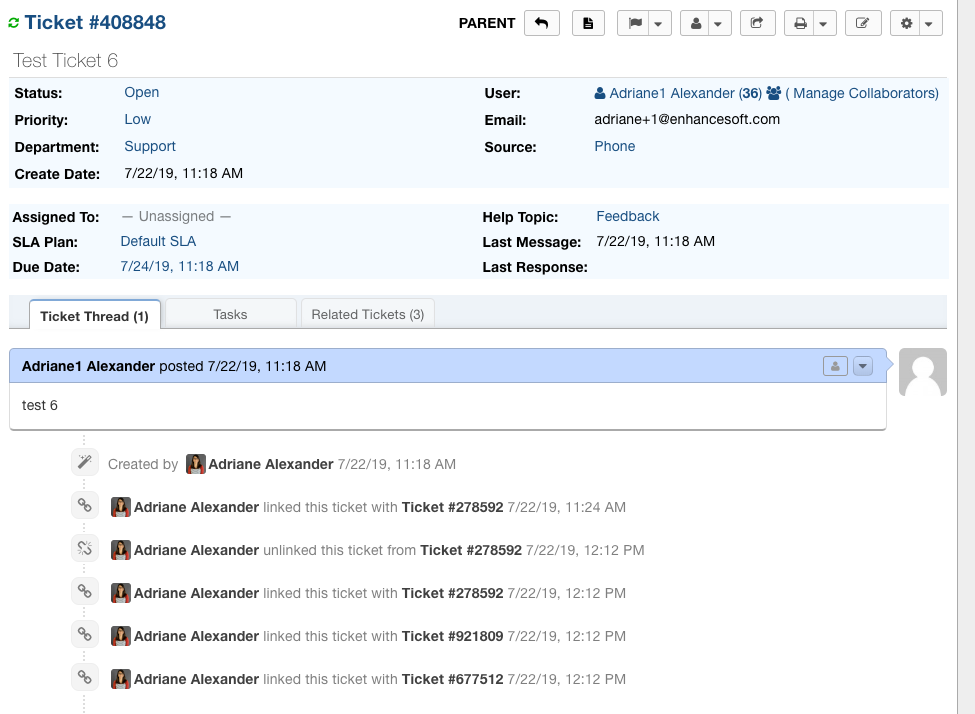
Merged/Linked Ticket Indicators
There are several ways to know if a Ticket has been merged or linked. There are optional configurations that can be set up on queues. Additionally, visiting a Ticket
that is part of a merge or link will have indicators.
Merged/Linked Tickets in the Queue
An annotation can be added to a column in a queue to indicate that a Ticket has been merged or linked. To do this globally, go to:
Admin Panel | Settings | Tickets | Queues | Select a Queue
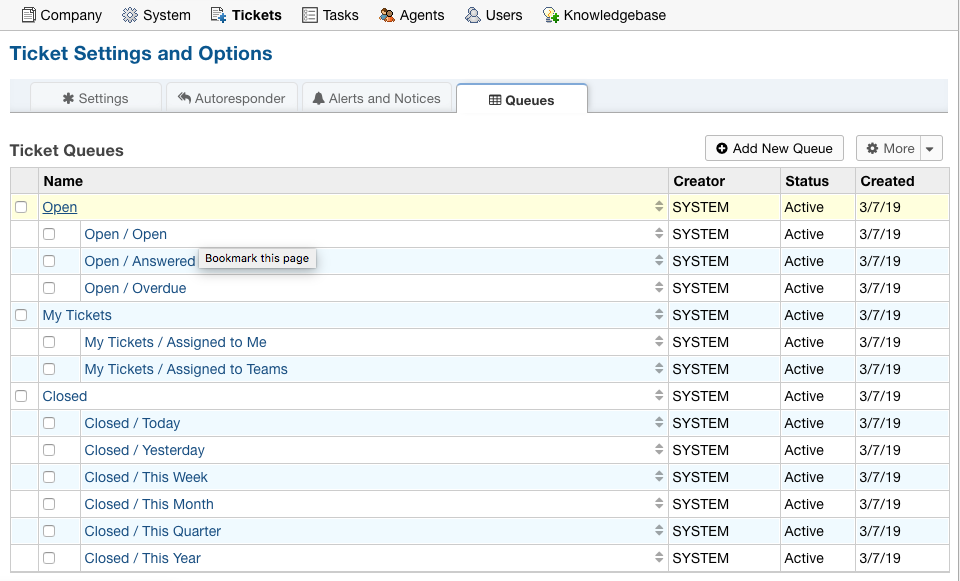
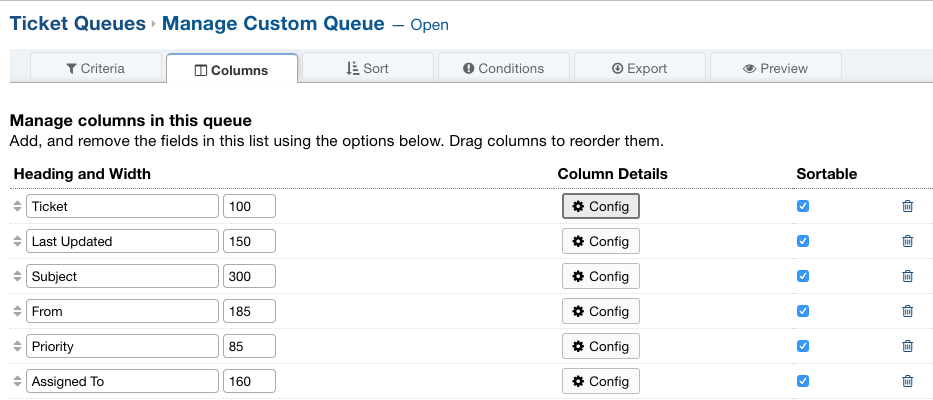
Next, go to the Columns tab and click the ‘Config’ button next to the column that should show the merged icon.
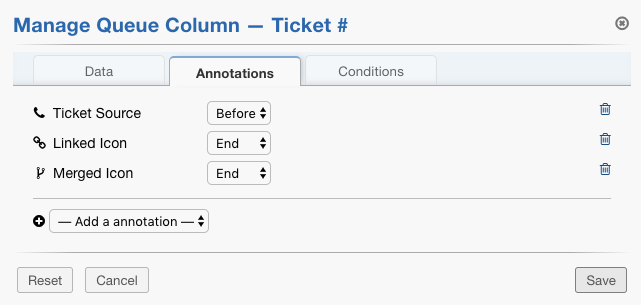
Go to the ‘Annotations’ tab and select ‘Merged Icon’. Choose where you would like the icon to be visible. In my example, I will show the icon at the end of the
Ticket Number column.
Once the changes have been saved, the Merged/Linked Icon shows up, depending on which has been done for Tickets.
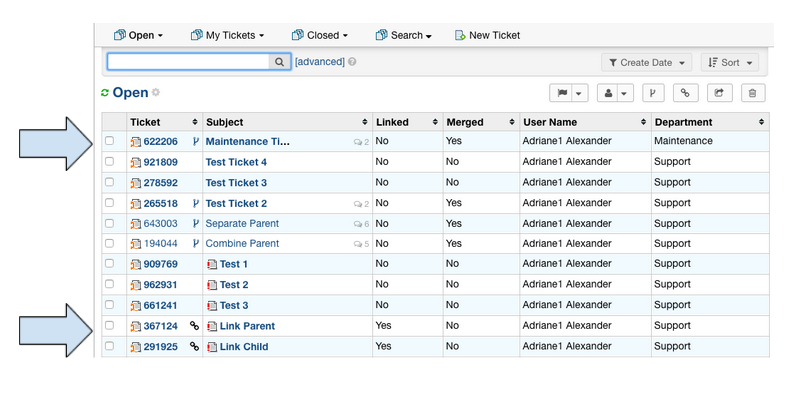
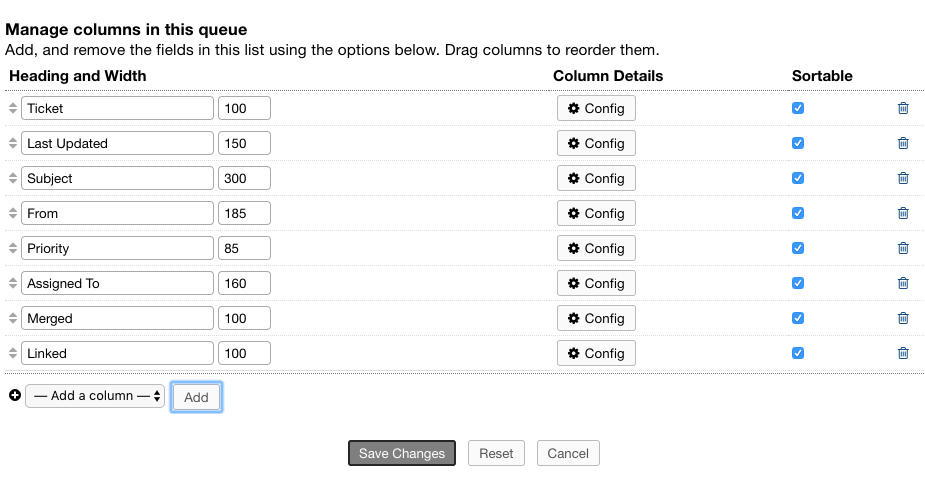
You can also add a column to indicate if a Ticket has been merged or linked.
Go to:
Admin Panel | Settings | Tickets | Queues | Choose a Queue | Columns Tab
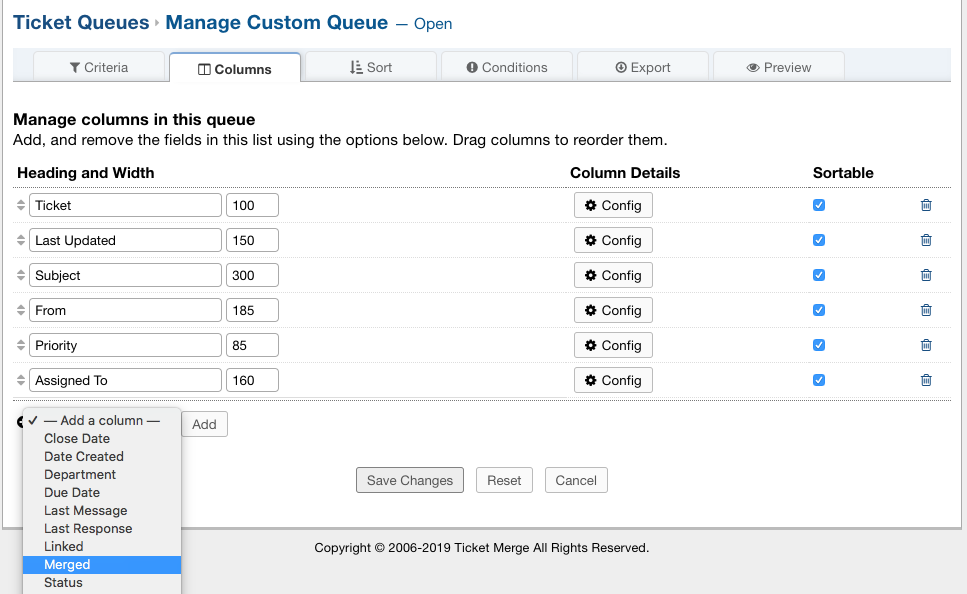
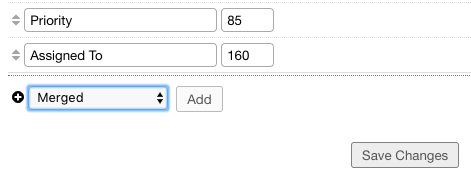
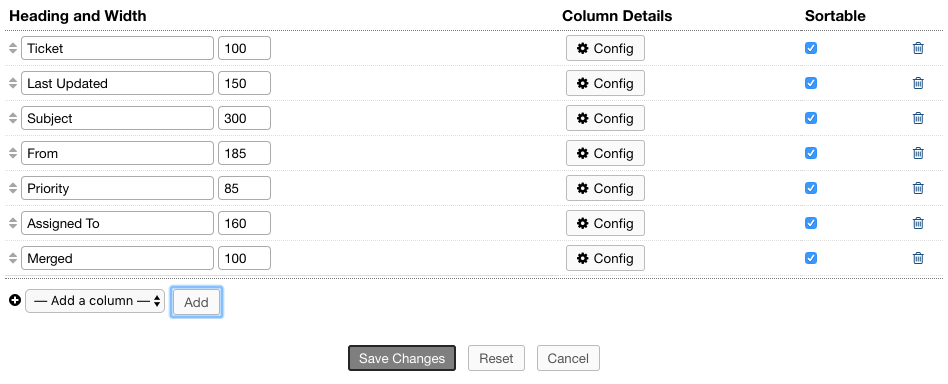
Repeat the same steps for the Linked column.
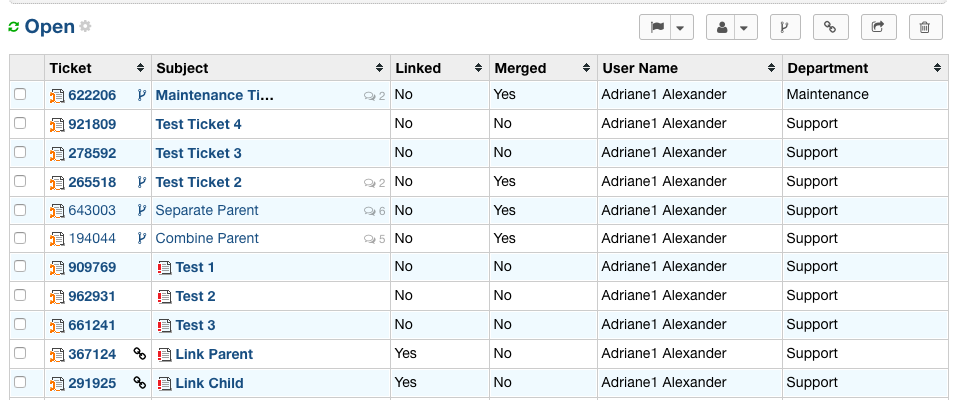
Once saved, the queue will show the new Merged and Linked columns.
Viewing Merged Tickets


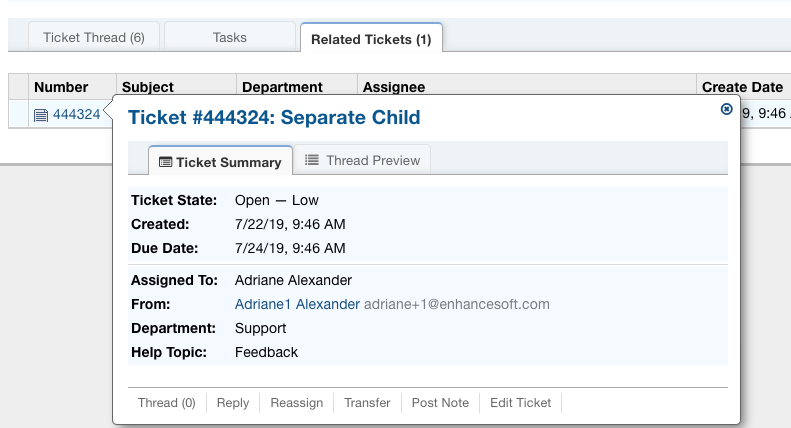
Both Parent and Child Tickets have a ‘Related Tickets’ tab to help easily navigate between the related tickets.

Hovering over the Ticket Number will show a preview of the related Ticket.
Merged thread entries have the merged symbol in the top right corner that displays the Child Ticket # when hovered over.
Searching for Merged Tickets
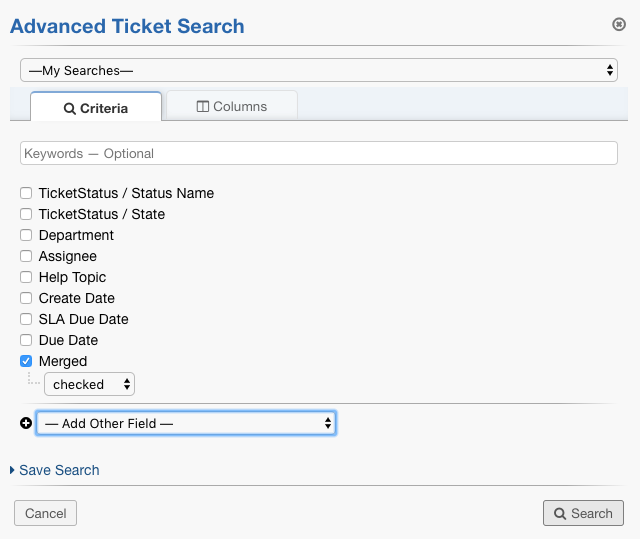
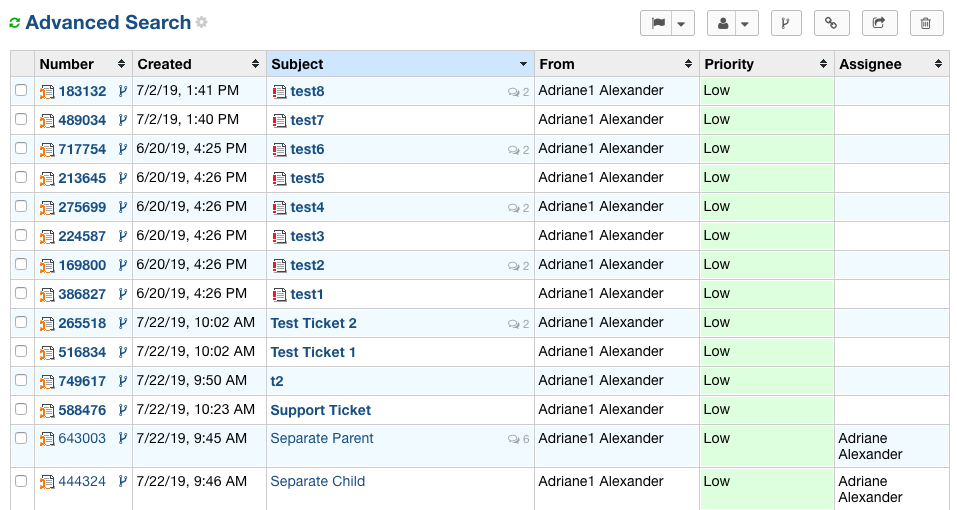
As mentioned earlier, Child Tickets for merges are not displayed in the Ticket queue, however, they do appear in search results. You can easily do a search for all
Merged Tickets by searching where Merged is checked:
Searching for Linked Tickets
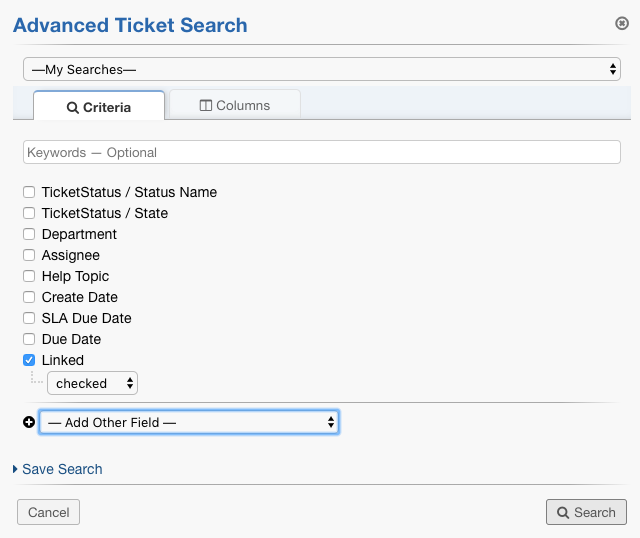
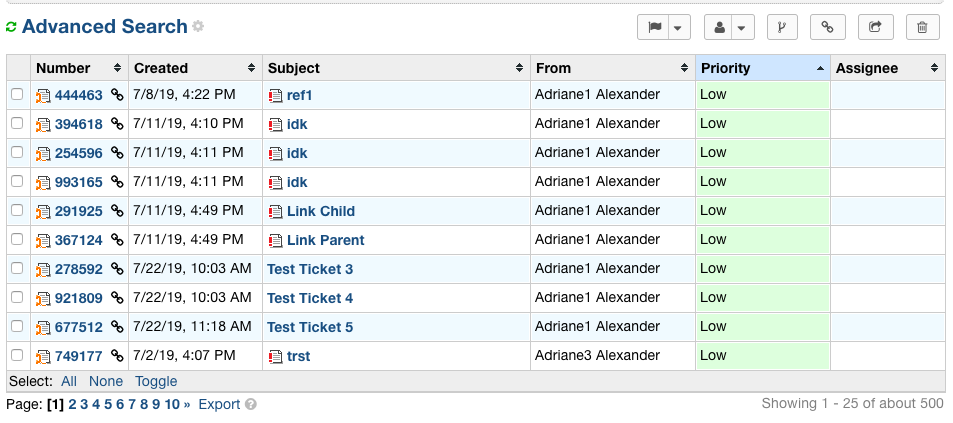
Linked Tickets can also be easily found by searching for where Linked is checked.
Merge/Link Icon Information
When choosing Tickets to merge/link, the Ticket rows contain helpful information about the Tickets chosen. The columns shown from left to right include:
- Ticket Number
- Ticket User
- Subject
- Thread Entry Count
- Task Count
- Merge Preview
- Link Preview
- Collaborator Preview
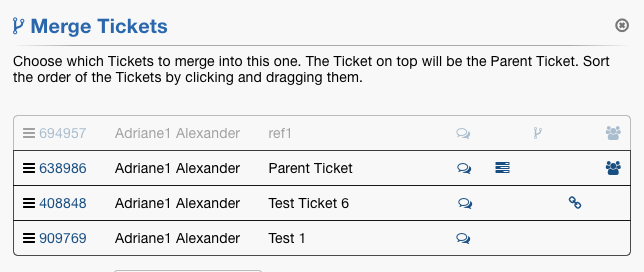
*Note: If a Ticket does not have some of the data listed, for example, tasks, a space is left where that icon would be.
Each blue item in the row shows additional information when hovered over.